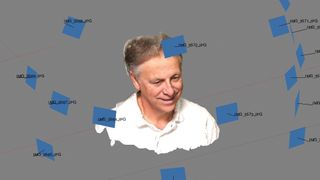
Don’t have access to a photogrammetry camera array to carry out a 3D scan? No problem, these tips and tricks will show you how to capture an actor quickly with great results for 3D art – and all you need is a camera or a one of the best camera phones.
Imagine you’re on a movie location with little equipment and only a few minutes with your actor. Getting an accurate scan and generating a useable CG model is now possible with just a smartphone and a laptop running Agisoft PhotoScan software.
LA-based Emmy and VES Award-winning visual effects artist, Johnathan R Banta, from Agrapha Productions, breaks down his five-step ‘RapidCapture’ photogrammetry process, taking advantage of professional tools.
01. Get the actor ready

Have your actor sit or stand (either is fine as long as they remain stable) and fix their gaze on a point in the near distance. Try to avoid direct sunlight or hard shadows. Our example here was in a room with fluorescent tube lights, but any ambient illumination is fine.
Clothing does not matter too much, but try to avoid solid colours, especially white, as the photogrammetry software finds this harder to solve (although in our example, the subject did in fact have a white shirt on).
02. Photograph your actor

Use any camera app on your smartphone (or use any camera). Try an app that lets you fix exposure for better results.
In this example, we captured a portion of the actor’s face with just 15 photographs following a geodesic capture pattern at a consistent distance from the actor. Starting at a 45-degree angle to your subject, take a total of 15 photographs in a ‘plus-cross-plus’ configuration.
Take one photo in the centre of the angle, stretch arms up, down, left, and right while taking photos pointing at the subject (ie. a plus pattern).
Cross-step 45 degrees around to the front, and photograph in a cross pattern. Take one photo in the centre of the angle, stretch arms to the upper left, upper right, lower left, and lower right while taking additional photos pointing at the subject.
Step 45 degrees around again, then repeat the plus pattern. You can always take more photos – a full rotation around the subject is likely to be 48-50 photos – but remember that the idea here is to carry out this scan as quickly as possible.
03. Solve the scan

Import your photos into PhotoScan. Choose one photo as the representative angle before picking the Align Photos option. This produces better results, and sometimes will determine the success of the algorithm.
There are several options in the software for resolution and point correspondence. The most consistently successful setting at this point has been to use the Medium solving resolution, and leave everything else at default.
If you are pleased with the alignment, go on to the Build Dense Cloud step, which will use your solved cameras and sparse point cloud as a guide for a more involved algorithm. There are several resolution options, but to test the solve, a resolution setting of Medium can produce results good enough to evaluate with.
There is often extra material in the dense point cloud that is not your subject. Use the lasso tools and other selection methods to delete this excess data before going any further.
04. Mesh and texture model

PhotoScan can take the resulting point cloud, and build a mesh of polygons to re-create the surface. Depending on your photos and detail of the subject matter, results can vary. Again, it loves detail, so areas of flat, smooth colour may end up a little noisy (most actors wear make-up to smooth out their skin, and this can result in a noisy solve).
The open-source software MeshLab has many capable tools that can take your exported points and build a surface, and if you need to work quickly, it can sometimes do this faster than PhotoScan. If you are serious about this, it is worth a try, but PhotoScan can do a very reasonable job of it, too.
The resulting mesh can be exported to other software as a guide for clean-up and modelling. As long as you keep the original scaling and orientation exported from PhotoScan, you can re-import this model for texturing. This is not necessary for quick evaluation, though, and you can build textures directly on the solved mesh as well.
The final step is to build texture on the object by projecting every single solved camera image onto the 3D model, and average the result inside PhotoScan. With properly aligned geometry, it is possible to achieve credible results quickly.
05. Export your 3D model
Export your model to a 3D program for whatever you need. Export formats include FBX, OBJ, PLY and more, which means you can work with the model in tools such as Maya, ZBrush, Mudbox and 3ds Max.
It’s in one of these tools that you can also do further clean-up, or take advantage of the dimensionally accurate model to aid in tracking, matchmoving or digital make-up work. Remember you have the original photos for reference, too.
(Thanks to R Brent Adams, director of the Center for Animation at Brigham Young University, for volunteering to be our scanning subject.)
This article was originally published in 3D World, the world's best-selling magazine for CG artists. Subscribe to 3D World here.
Related articles:


